When my oldest son was just a few months old, a family friend stopped by to visit and brought him a handmade blanket/quilt. It was simple and not overly attractive, but the thought behind it was so kind that it is still around here somewhere. The effort that went into making this creation meant so much. It taught me an important lesson about the ease of picking up a gift card versus putting that extra little touch of, "hey...I'm thinking of you..." into gifts we give others.
For years I made a variety of pseudo-quilted blankets. As the mom of a seriously sensory challenged kiddo, I have always made my quilts and blankets with a variety of fabric types, styles and textures. I started with bigger kid sizes but realized how appealing these sensory experiences were to little bitty ones as well.
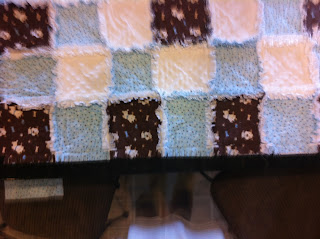
These blankets were all well and good, but I felt like something could be...more. In one of those perfect moments, the mother of a good friend introduced me to what I did not even know I was searching for...the Raggy Quilt! If you have never had the pleasure of experiencing one of these treasures, you are absolutely missing out! Here are a few of our creations...
These blankets have it all...snuggleability, weight, warmth, fidget factor...what more could you want? Oh...wait! They are not terribly difficult to make, they can be done in one day, since I have admitted to a penchant for that and it is something the kids can help with. My youngest helped pick out and piece together a blanket for a teacher who had a baby - it added his personal touch to this gift. Here's why:
Raggy Quilts begin by making little "sandwiches" of a layer of fabric (we prefer flannel), a layer of batting (we use 100% cotton), and another layer of fabric (again, we prefer fabric for the bulk of the blanket):
The sandwiches are then put into order based on how you want the finished quilt to look. It is a bit tricky to make sure the front and back both look the way you want, so when the front is done, I flip all sandwiches over to confirm they are in order. A good friend also learned the hard way that taking pictures of the front and back when everything is laid out just in case things get mixed up.
Each sandwich is then sewn with a "X" from about 1/2 inch from each corner. I prefer to use a wavy stitch, but this is a personal preference. I do, however, find it to be a little more forgiving for people like me who are not perfectionists. It is important that you stitch across the sandwich. During one of my first attempts, I thought it would be cute to tack the middle with a cute heart stitch...I quickly learned why these blankets have "X" shapes...the batting balled up in the middle of the sandwich and the blanket was nice and lumpy - cute, but lumpy.
Once all the sandwiches are sewn, I then stitch them together one row at a time. Here is the difference between Raggy Quilts and other blankets and quilts - there is no tucking under...the seams come together so the back is flat, but the topside seams are brought together at about 1/2-3/4 inch.
Once the sandwiches are sewn together, then the strips are sewn together in the same way, lining up the seams and, again, allowing 1/2-3/4 inch seams for "ragging".
At this point, I run a seam all the way around the perimeter of the quilt. As the seams will not go all the way to the edge, I often run this seam a bit deeper in (3/4 to 1 inch) so that it runs inside each seam.
Now comes the fun part (just a hint, this is a great "watching a movie" project as it definitely takes some time)...the snipping! I have tried snipping with a variety of scissors and have found the Fiskers spring-loaded snip scissors (intended for ragging) to be the best. How you snip is up to you, but you want to make sure you snip all the way to the seam, but not through it. There is no absolute width of strips that are snipped, but the more narrow, the more they will "rag" when washed...mine are probably about 1/4 inch.
Now to the washing part...again, I have done this by trial and error....so take my tips for what they are worth:
- I learned not to wash a new raggy blanket with anything else, especially towels! They shed!
- I wash them the first time on a regular cycle.
- I use dryer balls, the bumpy ones, when I dry towels and I have found they work wonders with the raggy blankets as well.
- When you dry them, they will shed...LOTS! I stop the dryer every 15-20 minutes and clean out the lint trap.
- After the first wash, there will still be some shedding during the next few, but it is minimal and it does eventually stop.
- The more times the blankets are washed, the softer they get and the more the ragging turns into more of a chenille.
There are more specific directions available as well as books, etc. The size of the squares, the size of the blankets, and so on are all up to you. When I give baby quilts, I almost always give a mini quilt as well, just in case the raggy blanket becomes the favorite blankie...then the larger size does not have to go everywhere.
Happy quilting!!!


